1-888-392-8766   0 Cart
Added to Cart
    You have items in your cart
    You have 1 item in your cart
    Total
    Check Out Continue Shopping

    Articles

    Finding YOUR Best Car Wax

    What’s the BEST WAX you have? This is a question all our customers want to know! The answer to this question is not as easy as one would assume. If there ever was a “Best Wax” we would have no need for multiple product lines and running our business would be easy. The question that should really be asked is “What is the best wax for ME?

    Every customer has different needs and tastes. Finding the proper product(s) starts with you. One can get seriously confused and intimidated searching through hundreds of products trying to make sure you get the best brand. The process can be simplified by following this article, we hope this article helps in the journey to find YOUR best product.

    Just a Wax? Often when a customer asks for a recommendation on a wax we find out they are actually looking for more. The term “Wax” seems to be the standard word for a product that makes the car shine and protect. The truth is, the wax is only a small part of the process and often needs to be teamed up with a polish to achieve optimum results. Using a wax without a polish is like spaghetti with no meatballs!

    Well than what do I need? There are two major steps to paint care, polishing and waxing. Polishes and waxes are two completely different products.

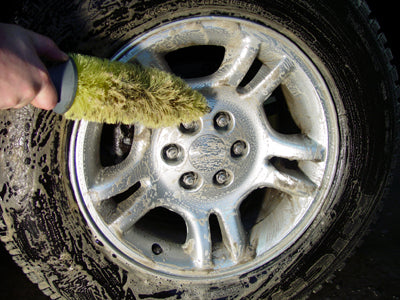
    Polish - Polishes are products designed to improve surface gloss and clean the surface contaminants, oxidization and compound haze. They may or may not contain abrasives but they are extremely mild compared to compounds. Many modern polishes contain cleaners which aid in surface cleaning while the abrasives or fillers aid in surface gloss, and hide minor swirls (See our article on swirl removal). Polishes will lay the foundation for your wax which will protect your naked surface.

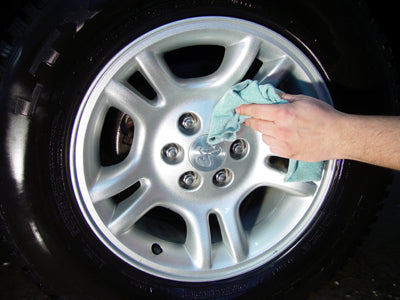
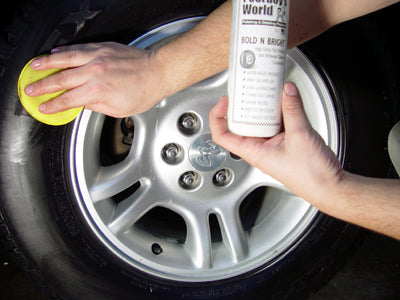
    Waxes - commonly blends of Brazilian Carnauba Wax are used for their deep, wet shine and ease of application. Nothing matches the warmth of nature’s beauty! Waxes will add extra depth, gloss and most importantly, protect your freshly polished surface!

    Combination Polish/Waxes - These products combine both a polish and a wax in one. This allows the user to accomplish both tasks in one easy step. Although this process works great initially, it is usually a compromise and lacks in durability. These combination products can usually still be topped with a Carnauba Wax to further increase durability and gloss.

    But I just want a Wax! - Not all cases require both a polish AND a wax. You may very well be fine with a pure wax. Not all customers are real worried about a show car shine and simply want to add a wax for protection. Also, many may already have a properly maintained and/or polished surface and simply want to try a different brand of wax. But remember, if it is surface correction, cleaning, or gloss you are after, polishing before waxing is a must.

    Okay, so what’s the best Polish and/or Wax!? Not so fast! We still need to get to personal needs! What makes product A better than product B for YOU?

    Time - How much time do you have? This is an important question. Many of my customers are diehard enthusiasts and have no problem spending several hours polishing and waxing in separate steps. Then there are customers who would like to get it done and over with so they can cruise as soon as possible!

    If you are person A and do not mind spending time, a two step polish then wax system will be a great starting point. Expect to spend about 1-1.5 hours on each step for a total of 2-3 hours. The advantage is each step will do a better job at what it is solely designed to do. The Polish will be more effective and the wax will offer better protection!

    If you are person B and want to get out cruising ASAP, then a one step polishing wax or cleaner wax will be the ticket. The results will still be great and with half the time spent, you can drive by Person A’s house waving goodbye as he is still waxing! A one step product may not offer the same durability as a two step system but when time comes around to doing it again, you know it will be a quick and painless process. Also, most one step products can still be topped with a pure wax later if you decide you want more durability or gloss.

    Carnauba or Sealant? - Just when you thought we went over your options out comes more. When picking a protection product you have two main choices, a wax or a sealant.

    Carnauba - Carnauba is a natural wax produced by the Brazilian Tree of Life. An application of a carnauba-based wax to your vehicle will protect it from UV rays, heat, moisture, oxidation, and environmental contamination. Carnauba waxes produce a liquid wet and deep glow that can’t be matched by any man made synthetic wax. It’s a favorite amongst car collectors and enthusiasts. The drawback to a carnauba based product is its durability. A carnauba based product will wear off in 6-8 weeks depending on exposure and climate. A vehicle which is garaged will last much longer than a vehicle which is exposed to the elements constantly. Heat and humidity also play a big role. Carnauba lovers will often tell you the shimmer and glow they achieve with a carnauba is worth having to re-apply every couple months!

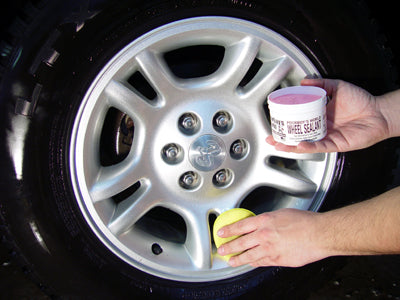
    Sealants - There is not much nature to a sealant. Sealants are man's artificial answer to waxes. Sealants are polymer based creations that topple the durability of carnaubas. Sealants bond to your vehicles surface forming a rock hard, reflective barrier of protection that will last up to one year! Sealants are extremely easy to apply, being a liquid form, they spread easily and dry to a dust free film that can easily be wiped off.

    So what will it be? Highly reflective or will it be Deep wet natural shine? 6 weeks or 6+ months of protection. The choice is yours.

    I WANT BOTH! Reflective AND Deep/Wet. - Of course you do! It is now becoming more popular for people to add an additional step to gain the edge they need. Many show car owners are finding that by applying a highly reflective and highly durable sealant followed by a natural carnauba, the highly reflective sealant shines through the wet carnauba creating an unmatched combination of science and nature.

    Now  you have a better idea on narrowing your product selection. If you have any specific questions on any product please EMAIL US or call (888)392-8766 so we can help.

    Klasse Application Instructions

    eShine Canada is proud to offer Klasse Car Care products! We hope this guide to proper application will be of assistance! Klasse All-In-One and High Gloss Sealant Glaze are among the best Paint Protection products available today. With proper preparation and application Klasse will keep your vehicle looking it’s best while offering unsurpassed durability and protection.

    The Klasse “Twins”

    • Klasse All-In-One is a true one step product. It cleans polishes and protects in one easy step! The cleaner in All-In-One removes existing wax, road films, light oxidation and visually reduces minor swirls. Klasse is Base and Clear coat safe.
    • Klasse Sealant Glaze provides additional sealant protection and a deeper, high gloss finish. Being a pure sealant, Klasse sealant Glaze can be layered multiple times to produce an even deeper, wetter finish! Layering will also increase the durability up to one year! Klasse is Base and Clear coat safe.

    Preparation

    • Properly wash and dry vehicle. (See our proper washing techniques article)
    • Work in a shaded area out of direct sunlight.
    • Surface must be adequately prepared for application of any polish. Excessive swirls, scratches or paint contamination must be properly addressed prior to Klasse application.

    Klasse All-In-One Application by Hand

    • Klasse All-In-One should be applied with an applicator such as our 4" Blue Polish Applicator. It can also be applied via terry cloth or microfiber towel.
    • Wet the Applicator, then wring out any excess water. The applicator should be evenly damp, but not wet. To dry the applicator you can place the applicator in a towel and squeeze; this leaves the applicator damp, but not wet.
    • Place a quarter sized dab of Klasse All-In-One on the applicator and apply using large overlapping strokes. It is a good idea to follow the contour of each vehicle. Move in a moderate speed applying moderate pressure. Do one section at a time (e.g., half hood, one fender etc) with each quarter sized dab of Klasse All-In-One.
    • If applicator starts to get dirty or dry, rinse applicator with water and wring out again.
    • After the product has been worked into the paint it will haze. When Klasse hazes remove with a plush microfiber towel. If the product is caked on and difficult to remove, you applied too much product. Try thinner application on the next panel.
    • If your vehicle is older, more neglected and possible badly oxidized, you may want to try a second application of Klasse All-In-One before moving onto the Sealant Glaze.  

    Klasse All-In-One Application by Machine

    • Using a Polishing pad such as our Lake Country 6.5” CCS Green Polishing Pad, apply 3 dabs or lines about 2 inches in length along the perimeter of the pad.
    • Please refer to Proper Pad Care for instructions on how to prep your pad.
    • If using the popular Porter Cable Dual Action Polisher, set to a speed of 4.
    • Apply pad to surface before turning on unit.
    • Work one section at a time (e.g., Hood, Door). Apply more All-In-One as needed to keep the polishing pad moist.
    • After Klasse All-in-One hazes remove with a plush microfiber towel. If the product is caked on and difficult to remove, you applied too much product. Try thinner application on the next panel.

    Klasse Sealant Glaze Application by Hand

    • While the Klasse All-In-One is applied easily, Sealant Glaze can be temperamental, and the Application/removal procedure should be followed closely.
    • Work in a shaded area out of direct sunlight and on a cool surface. This allows for longer curing time and allows the Klasse Sealant Glaze to be worked longer before hazing.
    • Klasse Sealant Glaze should be applied with a Fine Foam Applicator such as our 4" Black Sealant Applicator. Using the proper applicator with Klasse Sealant Glaze is crucial to ensure a thin/even application. If Klasse Sealant Glaze is applied too thickly or unevenly, it will be very difficult to remove.
    • Wet the Applicator, then wring out any excess water. The applicator should be evenly damp, but not wet. To dry the applicator you can place the applicator in a towel and squeeze; this leaves the applicator damp, but not wet.
    • Place a quarter sized dab on the applicator and apply with large overlapping strokes. It is a good idea to follow the contour of each vehicle. Move in a moderate speed, little to no pressure is required. Do one section at a time (e.g., half hood, one fender etc) with each quarter sized dab of Klasse Sealant Glaze. Klasse Sealant Glaze should be applied so thin that the product is difficult to see when applied!
    • If applicator starts to get dirty or dry, rinse applicator with water and wring out again.
    • Klasse Sealant Glaze can be applied/removed in two ways for maximum ease,
      1. Wipe-On, Wipe-Off. This method involves simply applying the Sealant on smaller sections at a time and removing immediately. It is a good idea to let sit for approximately 15 seconds. Many find this way reduces the chance of difficult removal and find the end result is unaffected. OR,
      2. Apply the Sealant Glaze to the entire vehicle before you start to remove the residue. The longer you let Sealant Glaze Dry, the easier it is to remove. Many customers even let it sit overnight!
        • Remove with a plush microfiber towel. If the product is caked on and difficult to remove, you applied too much product. Try thinner application on the next panel.  

        Klasse Sealant Glaze Application by Machine

        • While All-On-One applies easily by machine, Sealant Glaze can be a little more temperamental. For this reason, and because it applies so easily by hand, we recommend applying by hand even if All-In-One was applied by machine. After several hand applications you will have a better idea of the sealants characteristics and may want to save time by machine applying. When you are ready for that step please follow these directions.
        • Work in a Shaded area out of direct sunlight and on a cool surface. This allows for longer curing time and allows the Sealant Glaze to be applied longer before hazing.
        • Using a Finishing pad such as our Lake Country 6.5” Blue Finishing Pad, apply 3 dabs or lines about 2 inches in length along the perimeter of the pad.
        • If using the popular Porter Cable Dual Action Polisher, set to a speed of 4.
        • Apply pad to surface before turning on unit.
        • Work one section at a time (e.g., Hood, Door). Apply more Klasse Sealant Glaze as needed to keep the polishing pad moist.
        • It will appear that you are not applying any product, but in fact you are. Keep moving the polisher over the area you’re working on until the polisher glides easily and there is no visual haze or film.
        • Do not buff off any residues yet. Continue adding small amounts of Sealant to the pad and complete the entire car.
        • Applying Sealant Glaze by machine leaves little to no residue! After applying to the entire vehicle, remove with a plush microfiber towel.

        Tips and Tricks!

        • After your initial application of both Klasse All-In-One, and Sealant Glaze, try layering the Sealant Glaze! This will increase depth and durability. Wait a minimum of 24 hours in order for each layer to cure before applying another. There is no need to use the All-In-One again from this point unless surface becomes contaminated. Using the All-In-One again will remove your layers of Sealant Glaze starting you from scratch. High Gloss Sealant Glaze can be layered without fear of yellowing or discolouration. Some show car owners have a dozen or more layers of Sealant Glaze on their cars!
        • A common practice amongst show car enthusiasts is to top Klasse Sealant Glaze with their favourite Carnauba. This is not done for durability but more for that extra depth and glow only Carnaubas can offer. The brightness of the Klasse under the Carnauba will produce a breathtaking finish judges will drool over! Keep in mind; after a carnauba is applied you CAN NOT apply Klasse Sealant Glaze again until the carnauba is removed. An application of Klasse All-in-One will remove the Carnauba.

        Copyright 2011, eShine Canada (43986)

        Paintcare Terminology

        With so many types of products available it is easy for a new enthusiast to get confused with product type terminology. Below is a list of product types and their characteristics.

        Swirl Remover/ Compound

        Swirl Removers, (often called compounds) are usually liquid or paste products designed to permanently remove paint defects such as scratches, spider-webs, and swirls. They work by removing a thin layer of paint that contains the damage, and exposes a new layer of defect-free paint. Paint defects are made visible because of the sharp edges left in the surface. The light reflects off the jagged edges, and makes the defects visible. Once the paint is corrected it leaves the painted surface uniformly flat and will reflect light in one direction only, making the defects much less visible. Often several steps are required to speed up the process. It is best to use a compound type swirl remover by machine.

        BLOG:  Applying a Sealant

        Swirl Remover/ Filler

        Another type of swirl remover is one which uses fillers instead of compounds. These fillers fill in scratches with special resins. This type of swirl remover only works on slight damage and does not permanently repair the damage This types of swirl remover can be applied by hand or machine. The handjobber is a nice hand tool that will help save you some elbow pain.

        Polish

        Polishes are products designed to improve surface gloss by cleaning surface contaminants, oxidization, and compound haze. They may or may not contain abrasives, but they are extremely mild compared to compounds. Many modern polishes contain cleaners which aid in surface cleaning while the abrasives or fillers aid in surface gloss. Polishes prepare your paint for a wax or sealant. They strip the paint, and improve the paint, but they do not protect the paint. Another step is required to protect your paint from UV rays, and other environmental hazards.

        Sealants (Synthetic Waxes)

        Sealants (also called synthetic waxes) are man made protective polymer barriers that are applied over a freshly polished surface. Sealants offer many advantages over organic waxes, such as ease of application, 6+ months of protection, UV protection, and an outstanding shine. Sealants can be layered multiple times, which will create an even deeper shine. They form a protective barrier which resists acid rain, bug stains, bird bombs and will last through many, many washes. Although sealants lack in depth over organic waxes such as carnauba waxes, they can easily be topped with an organic wax to produce both a bright and deep finish.

        Waxes/ Cleaner Waxes

        Waxes are commonly blends of Brazilian carnauba wax. They also protect your paint against environmental factors, though for a shorter time. They are used because of their deep wet shine, and ease of application. Nothing matches the warmth of nature’s beauty! The downside to natural waxes are their very short lived durability. They typically last only a couple months at best and even less when washed. Carnauba waxes make a great topper for synthetic sealants.

        How to Detail your Wheels and Tires

         eShine Car Care Wheel Detailing

        Properly detailing your wheels (rims) will not only drastically improve your car's appearance, it will protect your wheels from getting ruined by the elements. Damage to your wheels is the result of improperly maintained wheels. Road salt and brake dust that sits on an unprotected wheel will eventually lead to the corrosion of metals, pitting of paint, peeling of paint and discoloration. A properly maintained and protected wheel will dramatically prolong the life of these materials.

        Although the majority of wheel cleaners are safe for all finishes, verify that the type of wheel cleaner you choose will not damage your wheel's surface. Some wheel cleaners are meant for painted/coated wheels and some are aimed at bare metal.

        Because your wheels are likely the dirtiest part of your vehicle, it is wise to start a complete vehicle wash with the wheels. This prevents splattering of the wheel's chemicals and grime from coming in contact with your paint. Never use the same brushes or buckets on your vehicle's paint as you do for you wheels.

        Here's where it all starts! Salt and brake dust are everywhere and this unprotected wheel will live a short life before it looks old and corroded.

        chrome rims, alloy wheel cleaner, rim cleaner, ph neutral wheel cleaner

        STEP 1

        Start by rinsing the wheel to remove all loose particles.

        Wheel detailing, Rim detailing, best cleaning products, wheel wax

        STEP 2

        Spray the wheel using your selected wheel cleaner. You will need to use a ph balanced wheel cleaner for regular use. one example is Angelwax Bilberry Wheel Cleaner, which is safe for all finishes.

        Wheel detailing, Rim detailing, best cleaning products, wheel wax

        STEP 3

        Using a brush specifically designed for use on wheels and tires (11" Stiff Wheel Brush or EZ Detail Brush) scrub entire wheel. Cleaning old dressings and embedded dirt from tires is an important overlooked step. Browning of tires is mainly caused by deteriorated tire dressings that have not been properly removed prior to applying another coat.

        Rim cleaner, safe rim cleaner, tire shine, detaling supplies

        STEP 4

        Rinse entire wheel/tire assembly.

        Wheel detailing, Rim detailing, best cleaning products, wheel wax

        STEP 5

        Now the rim is properly cleaned and ready to dry. Use a drying cloth that will not scratch the surface of your wheel. (Mini Dehydrator)

        Rim cleaner, safe rim cleaner, tire shine

        STEP 6

        To further protect the wheel from damage due to UV, corrosion, salt and other harsh contaminants, apply a wheel sealant or permanent coating. In this example we use Poorboy's Wheel Sealant.

        Tire Dressing, no sling tire dressing, best tire dressing

        STEP 7

        The final step is to apply your favorite tire dressing. Then you would apply Poorboy's Bold N Bright Tire Dressing, or a similar tire dressing product, with an applicator.

        Tire Dressing, no sling tire dressing, best tire dressing

        STEP 8

        Repeat the same process for all four wheels.  Let those tires shine!

        Wheel detailing, Rim detailing, best cleaning products, wheel wax

        Swirl Removal

        Swirls

        Swirl removal is a very important step in proper surface preparation. A swirled (commonly referred to as spider webbed) surface will make even the best waxes appear unacceptable, and often leave the user wondering if he chose the wrong type of polish/wax. Swirls are countless clusters of micro scratches usually caused by improper washing and/or drying. They are much easier seen on darker colour cars, and when the vehicle is in direct sunlight.

        Removing Swirls

        There are two types of products that will remove swirls, 

        1. Abrasive Compounds : Compounds use an abrasive type swirl remover. These swirl removers are usually liquid or paste , and are designed to permanently remove paint defects such as small scratches, spider-webs, and swirls. They do this by removing a very thin layer of paint that contains the damage and exposing a new layer of defect-free paint. Once this is accomplished, the painted surface will be uniformly flat and reflect light in one direction only. Often several steps are required. It is best to use a compound type swirl remover by machine although mild abrasive swirl removers can be applied by hand. Using abrasive compounds will permanently remove the swirls from the paint.
        2. Filler/Resin Type Swirl Removers: The second way swirls are removed are by using a product with no abrasives. These swirl removers use fillers instead of abrasives. They fill in scratches with special resins. This method of swirl remover only works on slight damage and does not permanently repair the damage. It fills in, and hides the imperfections. Some combination polishes (All in One Products) also do the job of a filler type swirl remover, thus reducing the steps required before your final product is applied. Filler/Resin Swirl Removals can be applied by hand or machine.
        3. All In One Type Swirl Removers: These products have a combination of abrasives and fillers. It will do some cutting, though not as much as the pure abrasive. If there is some swirls left, they will be filled in with the resin in the polish. Not every all-in-one product includes cutting abrasives. Read the product description carefully before applying. Often this type is recommended for beginners. It will permanently remove some of the damage, and hide what is left. This method can also be used by hand or machine. For more control over the hand application we recommend the handjobber system.

        Q: How do I know if I have an abrasive compound or filler/resin type swirl remover?

        A: Determining whether or not your product is abrasive or not is easy. Most products will state right on the label or description of the product if it has abrasives or not. When ever a product claims to remove swirls, AND states it is non-abrasive, you can bet it accomplishes this with fillers. Here is the twist, some products actually contain both abrasives AND fillers, these products will always state they contain abrasives but not always mention the fillers. One sure test to check whether or not your products contain fillers is using a 50/50 mix of Isopropyl Alcohol and water. After the application wipe the area with this solution, if the swirls re-appear, then the product does have fillers. All our product descriptions mention which products use fillers or abrasives.

        Q: Which type of swirl remover should I use?

        A: Deciding whether or not to use an abrasive type or filler type should be based on several factors. Filler type swirl removers usually only work on minor swirls, these filler types are easy too use and require minimal experience; they work very well by hand and do not require a machine polisher. Abrasive type swirl removers will remove heavy and mild swirls permanently, but they require a machine polisher. Each type has its own pros & cons.

        Abrasive Compound Type swirl removal

        PROS:

        1. Permanently removes damages from top layer of paint exposing new, unharmed layer.

        CONS:

        1. It is best to use abrasive type swirl removers using a machine polisher. Machine polishers properly break down the compounds and provide an evenly worked area.
        2. Requires some knowledge and/or practice to produce a haze free finish.
        3. Over a long period of time, repetitive use will cause the paint layers to get thin, eventually needing a re-paint. This is extreme and would only happen after many aggressive attempts.
        4. More time consuming, must follow swirl removal with a polish for maximum gloss and protection.

        Filler/Resin type swirl removal

        PROS:

        1. Does not require a machine polisher to apply.
        2. It is a quicker process, and requires minimal experience, simply rub in, then buff off.
        3. Will not reduce paint thickness over time like abrasive polishing will.
        4. Many Polishes have swirl removal capabilities, these products allow you to fill in swirls and polish at the same time reducing the steps toward your final finish.

        CONS:

        1. Swirls are only temporarily hidden rather than removed. When the product wears off the swirls re-appear. The life of the product varies depending on which product you use. Some products can last 3-6 months.

        Removing Swirls By Hand

        Swirls can be hidden by using a mild polish or swirl removal designed for hand use. The edges of the swirl will be rounded off drastically reducing their appearance. When the residue is buffed off the fillers will remain in the lower parts of the swirl hiding them from view. Polishes also add gloss enhancers to the surface making it ready for a wax/sealant. In this example we are using our HandJobber Applicator. It is the next best thing to Machine Application! The HandJobber is a Flexible Urethane Ergonomic Handle that accepts 4" Hook and Loop Pads. The ergonomic design greatly reduces hand fatigue and keeps your hands clean. The design also allows even pressure of the polishing/waxing surface, thus eliminating uneven results due to inconsistent pressures from each individual finger. We recommend Filler/Resin type swirl removers , or very mild abrasives by hand. Many mild swirl removers are often also referred to as polishes. Some examples are Klasse All-In-One, Wolfgang Paintwork Polish Enhancer , Optimum Poli-Seal and Menzerna Power Lock.

        STEP 1

        It’s best to work in a cool shaded area; this allows the product more time to work in before drying up. When working in direct sun, or on a hot surface the product will harden quicker and make it hard, or impossible to work with.

        STEP 2

        Work with one area at a time. A 24”x 24” (Half a door)  is a good size.

        STEP 3

        Apply the product to the applicator. Here we are using Wolfgang Paintwork Polish Enhancer. Wolfgang has great swirl hiding capabilities.

        STEP 4

        Using moderate pressure, work the product in back-forth motions. Switch directions every few strokes mimicking an X pattern.

        STEP 5

        Wipe off residue using a quality microfiber towel.(Tornado or Cookie Monster Towel)

        Depending on what type of product you used, you will now be ready for either polish, or a wax/sealant. If the swirl remover you used was a dedicated swirl remover which only removes swirls, you will want to continue to the polishing product. Polishing products have the gloss enhancers necessary for that show car shine. If you used an-all-in-one polish with swirl hiding capabilities then you can go right to the wax/sealant stage!

        Removing Swirls with Machine Polisher

        Removing swirls with a machine polisher is a much more effective permanent solution. Of course this will not prevent new swirls from happening but with proper care after this procedure, new swirling can be kept to a minimum. By using an abrasive compound and a Machine polisher, we will remove the layer of paint containing the swirls producing a new defect free layer. Machine removal of swirls often requires several steps depending on the extent of damage. In this example I am using a Porter Cable Random Orbital Polisher. This is a very popular polisher amongst enthusiastic detailers. Its random orbital motion makes it nearly impossible to burn paint and can be used by novice detailers.
        STEP 1
        1. It’s best to work in a cool shaded area; this allows the product more time to work in before drying up. When working in direct sun, or on a hot surface the product will harden and make it hard, or impossible to work with.
        2. Work with one area at a time. A 24”x 24” (Half a door) is a good size .

        STEP 2

        Here I am using a Lake Country 6.5" Orange Foam Cutting Pad; I will mist the pad with water to prime the pad. Always prep your pads.(See Pad Prep Article) Proper pad preparation is often over looked. Using the correct methods will lengthen the life of your pad, as well as give you better results. Never start with a bone dry pad.

        STEP 3

        Apply a bead in an X pattern across the pad. I will start with Poorboy’s SSR 2.5

        STEP 4

        Dab the pad in several locations on your surface to distribute the product evenly.

        STEP 5

        Start by setting the dial on a low speed at first and work the product in all areas for 10-15 seconds. This will eliminate sling and prime the surface and pad of product. I usually do this at setting 3. You can use figure 8 patterns, S Patterns or any other consistent overlapping pattern.

        Be sure to consistently cover the entire working area evenly. DO NOT apply excessive pressure! Doing so will not benefit you at all and will only cause premature wear on your pads. Press down slightly and make sure you are not deforming the pad.

        STEP 6

        After 10-15 seconds, kick up the speed to 5 or 5.5 using the same patterns as above. Work the product in until it becomes nearly transparent and just starts to dry. Buffing too long will often cause gumming up on the pad and likely scuff the surface. This scuffed surface will have to be worked again using the same procedure.

        STEP 7

         Use a microfiber buffing towel (The Cookie Monster) to wipe away any residue. Inspect the area, are the swirls gone? If not, repeat the process until they are. Remember, it’s not a race, this process can take time. An average sized vehicle can take 2-4 hours for the swirl removal process.

        STEP 8

        After the area is free of swirls you may notice a slight hazing or fog like finish (More noticeable on dark colors). This is completely normal. This is caused by the abrasives and cutting pad in the previous step. To eliminate this we will step down on the pad and/or the product. How much you step down depends on the combination that you are using. Here I use a 6.5" White Polishing Pad. with a milder product: Poorboy’s SSR2 . Repeat the same procedure as previous steps. The surface will now be crystal clear begging for some protection.

        You are now ready for Sealant and Wax! Your swirl free surface will expose the full potential of your polish and wax producing a show car finish that will leave people breathless.

        Social Proof